Sunday, May 29, 2011

I'm Back! & A Basic Black Smokey Eye Tut(requested)


Hi everyone :-)

This whole week has been really frustrating because there was no power supply,no telephone and no internet due to some guy who decided to chop off large trees which were there in his site and in that process they chopped off the power and telephone cables too! Gosh i was feeling like i was living in some remote place of antarctica where there is no supply of power,telephone and internet!:P Even now the cables are not set properly so i don't know when and for how many days the power is gonna go off.. :-( phew.. So finally(atleast temporarily) i'm back :D and i'll post the tut's of all the pending looks and some reviews this week.:-)

Today i am going to do a photo tutorial on how to do a basic black smokey eye which was requested by my dear friend romita.This is a very simple black smokey eye look which you can do within 10 mins!So let's get started.

When you are doing a dark smokey eye you better not apply the foundation & concealer before eye makeup because the fallout from the dark eyeshadow will ruin your base makeup.

Step 1: Prime your eyes with either a concealer or an eyeshadow primer(helps control the oil and thereby creasing if you have oily lids).Here i applied primer first and then a thin layer of concealer as a base to help the eyeshadow adhere to my lids.


Step 2: Then take a black kohl/eyeliner pencil and apply it to the upper lashline and a little bit above it.You don't have to be precise or neat because we are anyway gonna smude it.Apply it on the lower lashline too.


Step 3: Smudge the liner like shown in the pic below.(do not take it in to the crease)


Step 4: Now take a matte black eyeshadow and pat it on the smudged liner(on both upper and lower lashlines)Make sure that you apply it only up to half of the lid upwards(did that make any sense? :P) (see the next step to know what i mean).Most of the shadow should be concentrated near the lashline.Smudge the lower lashline's eyeshadow too.


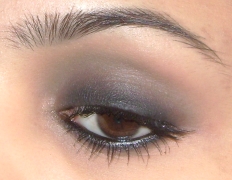
Step 5: Now take a blending brush and blend the eyeshadow upwards so that it fades as it moves in to and above the crease.


You will have somthing like this:


TIP: When you use a black eyeshadow for smokey eyes it tends to look grey and muddy on our warm skin tones when you blend it out.So what you can do is..With a blending brush take a matte brown eyeshadow which is a shade or two darker than your skin tone and run it over the grey areas.This will warm up that grey shade and add some life to your eyes.You can see the effect in the above pic. :-) 

Step 6: For browbone area use some compact powder/a matte eyeshadow close to your skintone to make it look clean and it also helps blend out any harsh lines of the black eyeshadow.Finally apply a black kohl/liner to both upper and lower waterlines and finish off with loads of volumising mascara.If you have false lashes then don't forget to put em on! :-)


After fifnishing the eyes you can apply foundation,concealer and powder.After that apply a warm peachy blush and you can also contour your cheeks,nose,temples and jawline with a compact/eyeshadow/blush that is 2 shades darker than your skintone or you can use a bronzer instead of contouring powder if you want to warm up your face.Finally apply a peachy nude lipstick and add some nude lipgloss over it and you are done! :D Here is the final look:


I you feel that your eyes are getting closed up with too much of dark eyeshadow you can add some frosty eyeshadow in the inner corners.This will open them up.


Hope you all liked this tutorial (especially romita :D)

Products used:
Face: 
*Yaby liquid foundation(mixed honey,pecan and custard)
*Ben nye banana visage poudre to set the foundation.
Cheeks: 
*Bourjois blush in "ambre d'or"
*La femme eyeshadow in "brown" for contouring.
Eyes:
*Eve pearl salmon concealer for under eye circles.
*Coastal matteworx eyeshadow primer.
*Oriflame dual skin corrector in "medium" as eyeshadow base.
*Inglot eyeshadow in AMC #63(matte black)
*Lafemme eyeshadow in "brown" (to warm up the greyish crease colour)
*Avon perfect wear kajal pencil.(for both lashlines)
*Shahnaz hussain kajal.(for both waterlines)
*Avon super shock mascara.


Lips:
*NYX lipstick in "frappuccino"
*Milani crystal gloss for lips in "Secret"


Brushes:
*Sigma E55-Eye shading brush (for patting colour on to the lids)
*MAC 217 (for blending)
*Sigma E20-Short shader (for packing and intensifying the black colour near the lashlines)
*Sigma E30-Pencil (for smudging and blending the shadow on lower lashline)
*Sigma F35-Tapered highlighter (To apply blush and for contouring)


Love,
Siri.

Thursday, May 19, 2011

Wella Kolestint Hair Colour Review

Hi friends :-)

Today i am reviewing Wella kolestint hair colour which was sent to me by the company's PR for a review.I chose two colours..one is "Black" and another one is "Dark brown".I thought i will colour my hair dark brown and my mom's black.But i couldn't colour my hair because as per the instructions the hair which is going to be coloured should be completely  free of any previous hair colour/treatments..I had henna treated hair so i had to skip it and i asked my mom to model for me for this review.Let us move on to the review now..

The packaging looks like this:
(Left:Black,Right:Brown)


Price: Rs.519.

If you want to know any other details or see what other colours are available click here: wellaindia.in

I was so diappointed when i first opened the package.There was no special care taken while packaging(like bubble wrap or sturdy outer cover).Botht he boxes were wrapped i some thin plasticThaila kind of cover.And look what happened to the boxes! grrrr...


Even my friend and fellow blogger deeptima faced this very same problem.But thankfully none of the content inside the boxes were badly damaged.

So this is what you get inside the box:


The instruction leaflet says the following:


Back of the leaflet


I read all the instructions carefully and then decided to use the whole cream at a time because my mom's hair is soooooo long and thick(her hair is naturally black in colour with some grey hairs here and there).

So first i applied the whole contents of pre colouration treatment to my mom's hair,combed them and then i wore the gloves,emptied the whole colour creme in to the bottle of cream developer and shook it until it reached a thick creamy consistency.

TIP 1: You can apply vaseline or any other petroleum jelly all along the hair line to prevent unwanted stains.

TIP 2: If you accidentally stain your facial skin/any other area then take a cotton ball,dip it in "savalon" and keep rubbing the stained area until it disappers.It's that simple and you will get rid of those stains within a few minutes.This is a tried and tested tip. :-)

Then i started to apply the colour directly from the bottle by parting sections of hair starting from the middle of the head and then moving outwards.I first concentrated on covering her grey hair and then normal hair.I finished applying the entire cream taking care to cover each and every strand of her hair.The quantity was perfect for her long hair.I told her leave it for 45 min and after 45 min she rinsed it off with warm water and applied the conditioner as instructed.

Rinsing off the colour was such a pain.It took nearly 4-5 large buckets of water to rinse it off completely!! (we don't have a shower).My mom used many hair colours at home before but none of them took this long to rinse off.So this was the biggest con for her.

I heard from many bloggers and users that this doesn't give a major chnage in their hair colour when they used a colour that was different from their natural hair colour(like dark brown,medium brown,burgundy etc.,).however in my mom's case the black colour worked perfectly well in intensifying her naturally black hair and also covered her grey hair too.So this is how her hair looked before and after colouring:

Before:


After: (without and with flash)


Her hair was so soft,smooth,glossy and the colour was so intense.It covered all her grey hair very well but when i was checking if there are any grey hair left i found this:


Did you see that Reddish colour?? I am clueless about this! why did this happen!?(if any one of you know the reason then please tell me).

Pros:

* Enhances and gives intense colour to your hair colour when you use the same colour as your hair's natural colour.(not artificial looking intensity..It looks very natural and healthy)
* Hair feels soft,smooth and glossy after rinsing off.
* It covers grey hair really well and since this is a permanent hair colour it is a very good option for those who have grey hair.
* Smells really good unlike other hair colours which smell sort of chemical and pungent.
* Very less ammonia content(I heard that it washes off with water and doesn't harm your hair)


Cons:

*Takes loads of water and time to rinse off.(A big con for those who live i a town/city with less water supply)
*Gave reddish colour to some of the grey hair(IDK if this a con or not because i don't know what is the exact reason that caused this :-/ )
*Quite expensive.

I am quite impressed with the results on my mom's hair.So if you want this hair colour to work for you then choose a colour that is very close to your natural hair colour and if you are lookin for a hair colour that changes your current colour then skip it.

I'll rate this product after seeing how long the colour lasts.

I'll update you on how long the colour lasted and also will let you know how the dark brown colour turned out when if i get a chance to use it(If i don't get a chance next time i'll pester my dad to model for me :P :D)

Love,
Siri.

Note: This product was sent to me by the company's PR for a review.But this doesn't affect my honest opinion. :-) and also this review is based on my mom's personal experience.It may or may not work the same way for you.

Sunday, May 15, 2011

Indian Vanity Case's Sleek & Inglot Giveaway.

Hi friends :-)

My cute fellow blogger 'cynthia' of "indianvanitycase" is hosting a birthday giveaway!


I usually post the links of giveaways on my sidebar..but i couldn't resist writing an actual post for this one because this giveaway by our sweet cynthia includes a thing that i am lusting over form the past few weeks! It is the"paraguaya i divine palette" from sleek's Avior la peche collection!! *woot* :D This awesome giveaway has some other exciting Inglot and sleek products too..So if you want to win those enter her giveaway HERE

(i wish i could win all the three prizes! hehehe... :P)

Love,
Siri.


Thursday, May 5, 2011

RESCUE TIME: Revive your dried out gel liner.

Hello friends.. :-)

Each one of us would've rescued someone/something from various troubles at various times.So i thought 'why not start a section to rescue makeup/beauty products' and here it is: "RESCUE TIME" :D Under this section i will be going to show you how to rescue a product which met with an accident or nearing the end of it's life :P :D

Today let us rescue a dried out coastal scents gel liner(for review click HERE ) and bring it back to life.I know there are a zillion ways to do this i.e., using inglot duraline and similar liquids/sealants,putting eye drops and contact lens solutions,microwaving and etc.,etc., But i didn't have any of those so i found out another way which i was easily able to do..All you need is a "hair dryer"! yes! a hair dryer is all you need.. :-)

This is how the gel liner looked liked when it dried out:


Take the hair dryer and your dried out gel liner..put the gel liner jar on a heat tolerant surface(cardboard,wood,cloth and etc.,).Switch on the dryer and make sure that it is in lowest heat/speed option possible..Heat the jar from all the sides(except for the upper part..because lid is made of plastic) for about 5 mins and then open it to check if the sheen is back or not(also try applying on hand with your brush to check the consistency).If you are not the happy with the outcome then repeat the heating process untill you are satitsfied that the desired texture is back.Make sure that you do not exceed 10 mins or else it will get over heated and it's texture may get ruined forever.


This is how the gel liner looked after the whole process:


Observe the sheen on the surface.(sorry about the mess..i was checking the consistency by dipping a brush in to it :P).It is back to life and it applies just as it did when it was new! smooth and buttery!yaaaay! :D

Don't worry if it dries out once again..just repeat the heating process and it will be back to life.. :-)

This is a simple 'no goop no mess' method of reviving a gel liner.Hope this helped.If you know any other way to revive the gel liner then please share below :-))

Love,
Siri.

Sunday, May 1, 2011

Coastal Scents Gel Liner Review

Hi everyone.. :-)

I bought this gel liner from coastal scents nearly a month ago. So here is the review:

Shade/colour: True black (a deep matte black)

Price: 6.95$ / INR 310 (approximately)

Weight: 3 gms/0.11oz

Where to buy: coastalscents.com

So this is how the packaging looks like:


This is how the jar and the liner inside looks:


The texture of the gel liner is smooth and buttery and is highly pigmented <3. See how black it is:

Left: single stroke,Right: heavy and thick swatch(pic taken indoors in natural light)


Glides very easily on the lid and dries down to a matte finish.staying power is quite good..almost 8 hrs! It doesn't smudge but it flakes off if you rub your eyes even just a li'l! If you don't do that then there is nothing to worry about.Everything was well and good until one day when i opened it to find it almost dry!!! see the pic below and observe the sheen on the surface..

(left: NEW, right: After a few days)


I think this happened because of the bad designing of the jar..coz my maybelline gel liner is in perfect condition even after a long time(will do a comparison post soon).The liner was all lumpy and crusty when i tried to pick it up on a brush.I lost all hopes of  being able to using it again..But i found a way to revive it! will tell you how in the next post :-)

Pros:
       * Very pocket friendly price.
       Quantity is huge.
       * Superb pigmentation.
       * Good staying power.
       can be used on waterline too.(test it first if you have sensitive eyes)

Cons:
        * Dries out super quickly in the jar.(altleast in my case it did)
        Dries out super quickly on the lids too.so you gotta work superfast while working on the eyes.


Rating: 4/5

All in all this is a great product to buy if  a good gel liner in pocket friendly price is what you are looking for.Hope this review helped.. :-) If you have anymore doubts/questions please feel free to leave a comment :-))

Love,
Siri.


Related Posts Plugin for WordPress, Blogger...